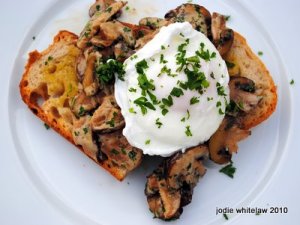
Mushrooms are in abundance at the moment and although living in the middle of London doesn’t allow for the fun of picking them ourselves, it’s no reason not to indulge in eating them as much as possible while they’re at their best.
Prompted by a recent outing to Peter Gordon’s Tapa Room in Marylebone, where I had scrummy wild mushrooms with a poached egg on sourdough, I thought I’d recreate the memory at home with some inspiration from Yotam Ottolengi’s new cookbook Plenty which I’m using a lot at the moment. This pimped up version of standard mushrooms on toast does take slightly more time than just throwing some mushies in a pan with a bit of oil and butter, so keep it up your sleeve for a lazy Sunday when you’ve got some time on your hands.
Mushrooms with poached egg on sourdough
Ingredients (for 2):
– handful of dried porcini mushrooms (or any other wild variety)
– 300ml water
– 300g fresh mushrooms (any kind, a mixture is fine)
– olive oil
– 1 garlic clove, crushed
– 1 small carrot, peeled and sliced
– 1-2 celery sticks, sliced
– 1/4 cup white wine
– a few fresh thyme sprigs
– 2-4 eggs (depends how many you want!)
– splash of vinegar
– 1/4 cup sour cream
– good handful of fresh parsley leaves, chopped
– salt and cracked black pepper
– fresh sourdough for toasting (or any bread you have on hand)
Before you begin, chop/slice all the veges as above. Place the dried porcini mushrooms in a small bowl, pour over 100ml of the water and leave to soak for half an hour.
There’s no need to peel or wash the mushrooms, but do brush them lightly or wipe gently with a clean cloth or absorbent kitchen towel to remove any dirt. Cut some in half, some in quarters and some sliced for a bit of variety.
Put a medium fry pan on a medium-high heat, add a tablespoon of olive oil and add the mushrooms to the pan. You don’t want to crowd the mushrooms as they will stew so do in batches if necessary. Leave the mushrooms for 1-2 minutes when you first put them in the pan to allow them to brown nicely. Then turn over and brown on the other side. Remove from the pan and set aside. Repeat if doing in batches until all the fresh mushrooms have been browned.
Next, add another tablespoon of oil to the pan and add the onion, carrot and celery. Saute for 5 minutes or until softened, stirring all the time to keep from browning. Once softened, add the white wine; it will bubble and steam, giving off a lovely aroma. Let it simmer away for 1-2 minutes.
Using your hands, remove the porcini from the water and squeeze out any excess water. Strain the leftover liquid through a fine sieve straight into the pan. Add the remaining 200ml water, the thyme and season with salt and pepper. Turn down the heat slightly and leave to simmer gently for 10 minutes or until you have reduced the liquid to about 100ml.
Once the stock has reduced, strain through the sieve, keeping the liquid and discarding the leftover veges. Then return the stock to the pan (with the heat off) while you poach the eggs and toast the sourdough.
Get all your toasted sourdough through the toaster (or under the grill with a drizzle of olive oil). Then get on with poaching your eggs.
To poach the eggs, fill a saucepan with a couple of inches of water (enough for a whole egg to cook in). Add a splash of vinegar and bring to the boil. Once the water is boiling, add your eggs. The easiest way to do this, is crack each into a small cup first and then pour gently into the water. As soon as you’ve added all the eggs to the water, turn off the heat and leave for 6 minutes. This is Yotam’s tip for getting perfectly poached eggs and it works! After 6 minutes, remove the eggs from the pan and drain on absorbent kitchen paper.
While the eggs are poaching, heat up the stock again, add all the mushrooms, the parsley, sour cream and salt and pepper. Stir to combine, taste and adjust the seasoning if required. Once the mushrooms have heated up, pile them on top of the toasted sourdough and then top with a poached egg or two. Sprinkle with some extra parsley and serve with the Sunday papers!


